What you will need
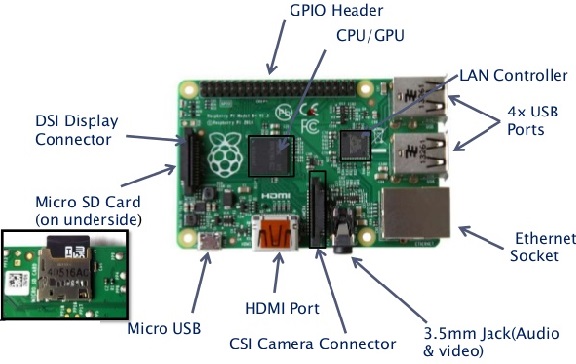
Raspberry pi
The Raspberry Pi is a low cost, credit-card sized computer that plugs into a computer monitor or TV, and uses a standard keyboard and mouse

microSD Card
We recommend a 8GB or 16GB SD card (class 10). Check here for more info about recommended microSD cards.
Note
The card class determines the sustained write speed for the card, a class 4 card will be able to write at 4MB/s, whereas a class 10 should be able to attain 10 MB/s. It would be preferable to buy a class 10 card, or higher, for better response of Raspberry pi
Display and connectivity cables
Any HDMI/DVI monitor or TV should work as a display for the Pi. For best results, use one with HDMI input, but other connections are available for older devices. Use a standard Ethernet cable for internet access.
Keyboard
Any standard USB keyboard will work for the initial configuration of your MAZI Zone.
Power supply
Use a 5V micro USB power supply to power your Raspberry Pi. Be careful that whatever power supply you use outputs at least 5V. Insufficient power will cause your Pi to behave in strange ways.
Internet connection
To update or download software, we recommend that you connect your Raspberry Pi to the Internet via an Ethernet cable.
USB Wi-Fi Antenna (optional)
We recommend the TP-Link TL-WN722N, for more supported models check here.
Software for the Raspberry Pi
We use the Rasbian operating system for the installation of the MAZI Zone. Official Raspbian images are available to download from the Raspberry Pi website: Download page
After downloading the .zip file, unzip it to get the image file (.img) for writing it to your microSD card.
Note
We use the Raspbian Jessie Lite.
You can find out in the next section how to write the image file to your microSD card. Click Next.
